Home Table of Contents Section II: Console Progress Section III: Wiring Diagrams Section IV: Console Construction Progress
THE BEGINNING (February - August, 2009)
I retired at the end of the year 2000 with three activities planned for the rest of my life. One was to get back into golf again, two was to build a model railroad layout, and three to build a home pipe organ. The golf turned out to be too time consuming and age related restrictions ruled it out. I started the model railroad in February of 2002 as seen in other sections of my home page. In February,2009, I had the opportunity to see and hear a virtual pipe organ and my interest was captured.
I immediately found the Hauptwerk Home Page and Milan Digital Home Page. I joined the Hauptwerk Forum and read everything posted for the last year. I downloaded the trial version of Hauptwerk and installed it on my computer. For input I used an old Yamaha MIDI keyboard and the existing sound card in my computer. The computer was so slow and lacking in memory that I could only load a few ranks of the St. Anne's organ. However, it was enough to convince me to get started.
By reading what everyone else was doing and researching on the web, I came to the following conclusions:
1. Find an organ that I liked with more capabilities than the St. Anne's.
2. Build an adequate computer with touch screens. The computer also had to be my main computer for everyday use.
3. Find an adequate audio/mixer and speaker/amplifier combination.
4. Select Keyboards, pedal board, cresendo and swell pedals.
5. Build my own console.
This sounds rather straight-forward, but for a beginner it was a steep learning curve. The following paragraphs describe the journey.
1. THE ORGAN (Summer, 2009) Before I could decide on the specifications for the computer, I had to make a decision on which organ I wanted. After several months of downloading and listening to many, many organ samples from several suppliers, I decided that the one I would start with was the E.M. Skinner organ from Milan Digital Audio. This is a three-manual organ that to me can sound good with the classics as well as most of the more modern organ music. I decided to go with the Masterworks version. It is a dry version so that I can add my own reverb. I also needed it for the double touchscreens. This meant that I had to go with the Advanced version of Hauptwerk. With these decisions made, I started work on the computer.
By the summer of 2011 I decided to branch out and acquire a few more organs. I decided first to buy the Silver Octopus Father Willis 80 Stop Studio Organ. I love it. Shortly thereafter I was invited to a Theater Organ concert and became enamored with the theater organ. I promptly ordered the Paramount Organ Works Paramount 450. This was a new experience for me and I have become a big fan of the theater organ.
2. THE COMPUTER (August, 2009) In August of 2009 I assembled a computer with a 2-core Intel microprocessor and 12 GB memory. As I acquired larger organs this became inadequate. In November 2012, I upgraded to the following:
Case - Antec Nine Hundred Black Steel ATX Mid Tower - This is a gamer's case that has excellent cooling capabilities and very quite fans.
Power Supply - Corsair CMPSU-620 HX620W ATX12V v2.2 and EPS 112V 2.91 - A very stable power supply that is almost silent.
Processor - Intel Core i7-3930K Sandy Bridge-E 3.2GHz LGA 2011 Six-Core Processor.
CPU Cooler - Corsair Hydro Series H80 Liquid CPU Cooler.
Motherboard - ASUS P9X79 PRO LGA 2011 Intel X79 SATA 6Gb/s USB3.0 ATX - Maximum memory 64GB
Memory - 2 G. Skill Ripjaws Z series 32GB (4 x 8GB) 240-pin DDR3 1966 PC3 14900 Quad Channel Kits (64GB total)
Monitor - ASUS VH242H Black 5ms HDMI 1080p Widescreen - This is my main everyday monitor sitting on my desk across the room from where the organ will be.
Additional Monitors - 2 Gvision P17BH-AB-459G Black 17 in Resistive LCD Touchscreen Monitors. Thes are working very well and 17 in screen is plenty for me.
Video card - EVGA GeForce GTX 960 04G 128 bit GDDRS PCI Express 3.0 x 16 SLI Support SuperSC ACX 2.0+ Video Card
Sound Card - Focusrite Saffire Pro 40
Effects Processor - Lexicon MX400
Solid State Drive (SSD) - Intel 520 Series Cherryville 240GB SATA III Internal Solid State Drive. This is Drive C: and holds the OS and Hauptwerk.
Hard Disk Drive - 1 Western digital Caviar Blue WD6400AAKS 640GB 7200 RPM (This is for backup of the SSD
Keyboard/Mouse - Logitech LX710 Laser Black USB Standard
LAN - TP-Link TL-WN722N USB 2.0 Wireless Adapter. I needed a wireless connection because of wiring restrictions.
DVD Burner
Operating System - Windows 7 PRO 64-bit.
Powered USB external ports - Tripp Lite U222-007-R 7-Port USB 2.0 self-powered Mini Hub.
I decided the sound card would be external with the on board sound on the computer motherboard deactivated. The decision was the E-MU 0404 USB Sound Card. It is advertised as 4 analog outs. It is really a 2 analog out sound card. Two of the outs are the monitor which copies the other two outs. However, with one set of stereo speakers this was all I needed. I used the monitor outs for my small computer speakers.
In August 2010 I upgraded the sound card to the EMU 1616m PCIe for additional channels and a better Digital to Analog Convertor (DAC) This card has 6 analog outs so I could upgrade to two sets of stereo speakers. Again, two of the outs were used a monitor outs and connected to my small computer speakers.
In May, 2013, I decided to upgrade all my equipment including the computer (listed above) and sound equipment. I chose the Focusrite Saffire Pro 40 effects processor. I also wanted to add reverb to my dry sets and added the Lexicon MX400.
The speaker-amplifier problem was the hardest problem to solve. The final sound really depends a lot on the speakers. The local Guitar Center store was heplful in letting me try a good number of speaker combinations. I finally settled on the M-Audio BX8a speaker pair.To my ears, they were the best sounding for the price. I bought the 8 inch over the 5 inch hoping they would suffice for the complete frequency range, but I had to go back and buy the M-Audio BX10s subwoofer. It made a big difference. I originally intended to have two sets, but the one set, even though they are classified as near-field speakers, does a great job of filling the room with sound. I route the output of the mixer to the subwoofer and from the subwoofer out to the BX8a's. I set the crossover at 70hz. This way, all the harmonics of the low notes get passed to the main speakers. These all are self powered speakers. The subwoofer is 240 watts, and the main speakers are 130 watts each. The subwoofer produces 20hz to 200hz and the BX8a's produce from 40hz to 22,000hz. With the crossover set at 70hz, neither is under much strain even at very loud volumes.
I now have two M-Audio BX10s subwoofers and 2 sets of M-Audio BX8a stereo speakers. Altogether they make a powerful sound.
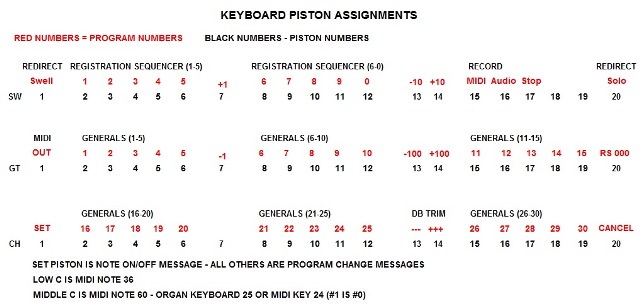
The keyboards and pedalboard was probably the easiest for me to decide. After reading only a few experiences of rebuilding old consoles for MIDI, I knew it wasn't for me. A search on the Internet found Classic MIDI Works of Canada. Early January, 2010, I ordered the 3-manual Classic MIDI Pro-Keyboards, the Classic MIDI Pedalboard, and the Classic MIDI 3-Pedal Swell Shoe Kit. I made an Excel spreadsheet representing the 20 pistons on the three manuals (see below).
All the pistons are programmed for a MIDI Program Change message except the SET piston. It is programmed as a Note ON/OFF MIDI message. This allows the piston to be active only when it is held in. Be advised that to program both Program Change and Note ON/OFF messages on the same keyboard, you must be using Version 1.5 or greater of the CMK Config Program and the Keyboard must have the latest version of the MIDI encoder chip. I arbitrarily chose to progran the top manual to MIDI channel 8, center manual to MIDI channel 9, and the lower manual to MIDI channel 10. The pistons are programmed to for Program Change 1 - 20 on each manual. The first piston on the lower manual is programmed for MIDI note on/off.
The pistons are arranged as 1-5-1-5-2-5-1 for a total of 20 on each manual. I decided my 60 thumb pistons would be used as follows:
The SET and CANCEL pistons are the bottom left and bottom right pistons.
For a four manual organ,Swell pistons 1 and 20 switch the manual back and forth between Swell and Solo.
Top manual Piston 15 is START MIDI Recording, Piston 16 START AUDIO Recording, and Piston 17 STOP Recording. Pistons 18 and 19 are for future use.
Center manual Piston 1 sends MIDI out from all three keyboards and pedal to my Yamaha Clavinola piano.
For me, one of the most important features of Hauptwerk 4.0 is the Registration Sequencer or Stepper. With 16 pistons you have the equivalent of 1,000 presets in any order you want to use them. See the Hauptwerk User's Manual for this powerful and inportant feature. You can see in the chart below the pistons I chose for this feature. The single piston is +1 and -1 for the sequencer and the double pistons are -10 and +10 and -100 and +100. The middle manual right piston sets the stepper to zero which I leave unprogrammed and results in a general cancel piston. On the Choir manual, pistons 13 and 14 trim the master volume up and down.
Most of the remaining pistons are used as general registration pistons. In Hauptwerk 4.0 you can have many pistons even if the organ sample has none or very few. This is another great feature.
Home Table of Contents Section II: Console Progress Section III: Wiring Diagrams Section IV: Console Construction Progress